
...well, it was more than an ouch, more like an OUCH!... you know, those bold, capital ouches that realllllly hurt! Well, picture the scene; me, chopping up chicken breast... frying pan with a bit of olive oil in it ready to cook said chicken... and then me, in my infinite wisdom, tipping the tray of chicken into the now smoking oil, whilst leaning over and turning the gas down... and the ensuing blue air surrounding me when said molten oil leapt out of the frying pan and all over my... how can I put it... decolletage... I am being polite here folks... And... also in my infinite wisdom, I had taken off my warm snuggly hoody because I didn't want to splat curry paste onto it when I was cooking... so I was wearing just a vest. Mmm, quite! I have no excuse either because I do own pinny's...several of them indeedily.
Anyways... after several hours of moaning and groaning and whinging and whining and the applications of cold compresses, I have been left with a few lovely blisters, two of which I have popped already, the biggest is about the size of a 5p so not that bad but still... I relate this story purely to extract sympathy from you (milking it for all I can... ) And obviously, because of my injury I am unable to cook for a while... and need to get inky to take my mind off things. (am trying that one out later lol) Just as I know that in a couple of days time the blisters will heal over and I will be called Scabby Sheridan for a few weeks... attractive eh?
This post is punctuated with pictures of a couple of cards from last weeks show - focussing on the Studio 490 Botanical Art stamp set. The background of the green one is the Picket Fence "resist" technique I showed on the show. Now, if you didn't get chance to see that show, give me a shout and if a few of you would like to me to do it as a Tut on here I will do :O)) (I don't want to do it again if it is going to bore you lol)
Right, I shall away... oh and before I go I will show you what I did last night/this morning... you know those gorgeous District Market goodies from the Duke of Distress? Well, I love my bag loads and loads... and use it all the time... I wanted it to look a bit different though so.. I cracked open the ProMarkers (not been used for 387 years) and coloured the butterflies in... once each butterfly was coloured I wiped over the top with a babywipe which removed the sticky residue from the pens and paled the colours down a bit... looks more natural. I have coloured all the sides but not the bottom... I just realised that when I took the pics lol Off to get the pens out again!
Right... am deffo off now... time for me to play with ink, Studio 490 stashly bits and get creative! Thanks for looking... TTFN!
Hels x
(PS Don't forget to tell me if you want that Tut ;O*)
PPS... don't forget about the Art Parts giveaway too... click HERE for the deets!!
Tuesday, 7 February 2012
Ouch....Like Really...
Saturday, 28 January 2012
Saturday Show & Hels... Pom Pom Tissue Wrap Flower
...I thought it about time to do another Show & Hels... and I have been asked a few times this week if I could do a step by step on how I made the Pom Pom flower that was on here the other day. So... I have spent a happy couple of hours with the camera (apologies now for the rubbish photography and the yukky hands lol) Here we go... oh but before that... a little look at the finished tag... which I should add... I am giving away... more of that later on :O))
So... here's what you will need:
Tissue Wrap - either flavour work for the flower
Tiny Attacher
Scissors
Distress Ink & Blending Tool
STEP 1
Tear off a piece of Tissue Wrap to measure approx 20cm - it doesn't have to be an exact measurement... near enough will do :O)) Fold the wrap in half and then in half again.
STEP 2
Hold the folded edge of the strip in one hand and cut into the opposite edge - you need your snips to cut down about 2/3rds of the strip... and a couple of mm apart - again this isn't an exact measurement, remember the thicker the snips, the less fluffles you will get on your finished Pom Pom.
STEP 3
When you have snipped right down the length of the strip, wind it loosely around your index finger.
STEP 4
Using the Tiny Attacher (or if you have a baby Bambi stapler instead), staple a few times into the join to keep the whole layer attached.
STEP 5
Once the layer is fastened together you can ruffle the snipped bits out. You will see in this photo that the folded edges of the paper are showing. This will give you a less fluffled look.
STEP 6
Alternatively, if you would like a more fluffley look, snip along the top edge before you wind it around your finger and fasten... or if you have done the above step already and decide you prefer the fluffley look, you can just go in a trim it... tis up to you :O)) **don't look at that pink stuff on my finger... it isn't really there... I haven't really been using it on show samples ;o))**
STEP 7
Tear a piece of wrap off to measure approx 15cm and repeat the folding and cutting process. Once you have done that you can snip the edges off as before... or leave them if you want a less fluffley (yep that word again) Pom Pom.
STEP 8
For the final layer you need to tear off about 10cm of wrap. Once you have folded it (as before) snip off about a 1/3 of the length... this makes it easier and less bulky when you come to assemble them together. With this layer only snip half way down it, instead of 2/3... this makes it more pliable... any more than half way down makes it too flimsy.
STEP 9
*uh oh, those fingers again... you can't see them can you?* Once you have snipped along this layer, wind it around your little finger... the tighter this layer the better for assembling.
STEP 10
Using the Tiny Attacher (or Bambi stapler) staple in as far as you can... you will see that the staple doesn't fit right in... you just need to make sure it isn't going to come undone. *you still aren't looking at those disgusting nails are you?* Once it is secure you can then start to assemble your layers together... and you can snip down the size of the little one if you prefer a stubby look for the centre of the Pom Pom... that's what I have done with mine.
STEP 11
Not really a step as such... just a pic of what they should look like before assembling.
STEP 12
Use your finger to guide the little layer into the 2nd layer... the hole in the middle should make a snug fit - if it doesn't, don't worry... you can add a little glue :O)) Once you are happy with those two layers, open up the hole in the third layer and fit the other one into it... again, a snug fit but... glue if it isn't.
FINISHED - BEFORE INK
You can see that the layers all look nice and fluffley... and the middle is nice and stubby... like the middle of a daisy perhaps?
FINISHED - AFTER INK
I added ink to the ruffles using Spiced Marmalade and a Blending Tool... I concentrated the ink in the centre so it is a smidge darker... for the finished tag, I added Fired Brick around the longer layers.
TA DAH!
That there is my finished tag... now, I mentioned earlier that I would be giving this away... well I am! To be in with a chance of winning this tag is very simples... leave me a comment here... that's all! I will draw a winner at random and announce on next Saturday's post (4th Feb). Right... tis waaay past my bedtime... I got all engrossed in this at about 11pm and I am sitting here shivering now cos the heating has gone off and I am verrrry chilly! Thanks for looking... please do let me know whatcha fink! TTFN
Hels x
PS... I can't remember who asked... the music score I take my pics on... is proper sheet music... aquired from the popular online auction site ;o))
PPS... thanks also to ... Alison Horne... the thingywotsit from yesterday has a name! A Diorama!! How cool is that!!! x
Thursday, 26 January 2012
Grungy... Ruffles...
..isn't that just one of the best words? Ruffles! If you say it loads of times it sounds really daft too lol Anyways... Grungy Monday this week is focussing on the Cracklepaint Resist technique... see HERE for lovely Linda Ledbetter's blog and HERE for Tim's YouTube vid showing how to do the technique.
I had a little play earlier in the week and have already entered once... however, I don't know about you but for me, if I start to use something that I have been ignoring of late, I go a little OTT and end up making more than one thing with it... Cracklepaint is in my spotlight this week... and I had painted several tags with different colours - you know, just to see which ones I liked best. Some of my Cracklepaints had gone all thick and ikky... so I just walloped some water into them and stirred them up and voila, they are useable again! Hurrah!
This particular tag started life with Milled Lavendar CP being roughly painted on it. Now, I have never really been one for the Milled Lavendar pad, being as it is a bit pale.. I lurve the Stain version and now I really love the CP version (and can't wait to get the PEN version!) Even though the CP is a light mauve colour, I decided to use Victorian Velvet DI to colour the rest of the tag and then went around the edges with Seedless Preserves. In all honesty, I haven't used Victorian Velvet for well over a year... why? I have no idea.. it is a stunning colour! I think I shall be revisiting my pink phase! The resist part of the tag was done using Pumice Stone DI and the large background on the Papillon set... I also used Pumice Stone and clear embossing powder to make the little butterflies pop off the background a bit too... they aren't too noticeable in the photo though... I could blame the light, the camera or just admit... I am a rubbish photo taker (can't even call myself a photographer lol)
What do you think of the pom-pom flower? It is made from Tissue Wrap that was cut into strips, folded over four times and then snipped into with my Tim scissors (nice and sharp to the point) and then wrapped around my finger and stapled to keep it fastened into a circle. As I went along I moved from index finger, to ring finger to little finger so each layer (there are 3 of them) is smaller and fits together nicely. I then ruffled the flower up and blending some Seedless Preserves over the top and use hot glue to fasten it to the tag. The leaves are cut from some printable canvas that I found in the clearout last week... cut using Tattered Leaves and coloured with Crushed Olive and Forest Moss Stains.
Right then... time for me to go and get inky again... I was tired earlier but have got my second wind so there's only one thing for it... hot coffee, Smooth 70's on the radio and me with a pile of diecuts and ink... ahhh, bliss!! Thanks for looking... have a lovely day! TTFN
Hels x
Friday, 25 November 2011
Baby You Can Drive My...
...errrrrm... pick up truck? Well, it started out in my head as a car... but by the time the idea got all that way and onto my desk, it transformed into a pick-up truck. I have had this idea buzzing about for a yonk and a half and have never got around to doing anything about it, so, I decided to take a little time out and sat and got all painty and sticky... and put together my Configurations Pick Up Truck. Ok, so he may be a little rough around the edges... and his wheels may be a little bit too big... but... I rather like him! He obviously needs a name... I was thinking Timmy might be apt seeing as it is a truck and... most of the stashly bits I used on it were from the creative genius that is the one and only Duke of Distress himself, Tim Holtz. Whatcha fink?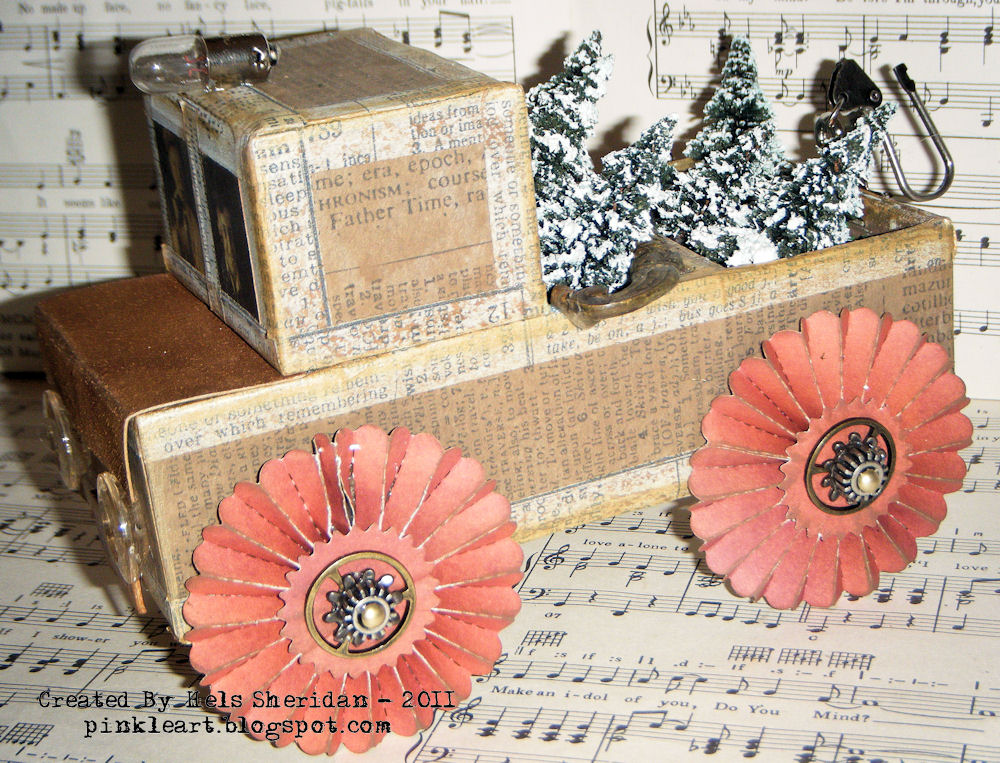
I started off by nabbing some of the boxes that go inside the big Configurations boxes and stuck them together to form the base of the truck. I used Matte Multi Medium to glue Crowded Attic paper over the sides of the truck and then glued DM Tissue Paper over that... again using Matte Medium to stick it down. To cover up the snarly edges, I used Tissue Tape... and then gave the whole lot a wash with watered down Espresso Dabber... using a big fat brush to get a streaky and dirty look. **a bit like Ferdy normally looks unless Grim gets him cleaned for me.. which he did last weekend so Ferdy is sparkling like a gem at the moment lol**
The "cab" is made from another of the little boxes... again covered as before but for the front of the cab, I snipped two pics from the Lost & Found Stack and then added more Tissue Tape. The bonnet is made from Grungepaper which was coloured with Vintage Photo DI and folded and stuck under the cab to secure it in place. I stuck the cab to the base using Multi Medium... I had tried hot glue but just a nudge and it fell off... so Multi Medium may take a while to set, but once it is... wow, it is stuck fast!
The wheels... ah yes, the wheels... well, in my head, I needed large Rosettes... so that is what I cut... and assembled... and embellished with metal bits and bobs... but erm... when I came adding them to the truck, I realised that... ahem... they were a smidge on the large size... well, they are monster wheels on a monster truck, which is the look I was after all along (see Hels' nose grow) The "engine" is actually full of beady chain and stuff... but check out the little bonnet prop... how cute is that! I popped an ickle magnet onto the Grungepaper and the prop is part of the same handle thingy that I used on the back... and it has lost part of its circle, which means it fits perfectly on the edge of the box... am happy about that coincidence!
For the "pick up" bit, I added an old metal drawer handle that I got in an Antique Mart near Chesapeake Bay, Maryland... which is why I also scoured those numberplates on the Lost & Found stack to see if I could get a Maryland plate... and huzzah, there was ONE... so that was snipped, popped onto mountboard to make it sturdy and then glued onto the front of the truck... the one on the back... well, there isn't one so... it fell off when a tree brushed against it (tis my story and am sticking to it officer lol) I made a little hooky crane jobby using a Hinge Clip and a DooDah... can't remember the name of those ickle bulldog clips... you know what I mean though....
And... finally... I chucked a load of ickle Christmas trees I bought last year... they were from a model shop and cost me about £15... and they were supposed to be for a "Winter Wonderland" scene I was concocting and never finished... well, they aren't stuck in there so I can always remove them and pop Easter Eggs in when the time comes... see, a truck for all seasons!
Anyways... that's me for today... I have an appointment with Victor Vagabond and a pile of Alterations dies... tis time to finish up the kits of the workshops tomorrow and Sunday... which... BTW, still have two places left for Saturday... so, if you fancy joining me to make a Book of Advent.. which is basically a countdown book for your mantlepiece... CLICK HERE for the deets... Thanks for looking... time to get cutting! TTFN
Hels x
EDIT..... just thought... my pals in the US will think I am deranged... a bonnet? on a car? huh? Tis a hood where you are... I think... **quickly rushes off to ask Ellen lol**
Wednesday, 23 November 2011
Simon Says.... Tickets Please...
... Tickets Please... that reminds me of one morning... in a previous life... I had stopped my train at London Bridge station and a lady came up to the cab and said "A pigeon got on the train at Blackfriars and he is still on there" So... I replied... (much to my shame) "Oh dear, I bet he hasn't got a ticket either... these fair-dodgers...." Thankfully she had the grace to laugh a bit... However, I have digressed before I even started! Well, this week the talented folks at Simon Says Stamp & Show are asking to see Tickets on ones (ooh get me, all posh-like) artwork.
So... I decided to have a little play and made a tag... for a change like cos I haven't made one for about... erm... three weeks (ok, a smidge of a white-lie there but...) A couple of days ago I had a delivery... yes, I got the new District Market Tissue Paper. Well, I had seen it, read about it, heard about it... and I thought that it would be terribly remiss of me not to try it out for myself. So, I just did... and wow, I lurves it. For those who haven't got this yet, here's what I thinks; it is packaged in a box, like one of those Cling Film boxes from Morri's and it has a metal serated cutter built into the box. Now, I don't know about you but in the House of Sheridan whenever we get about half way through a box of Cling Film, cursing starts because the box is collapsing and the "cutter" is blunt... well, I can't see how this would happen to the Tissue Paper box, it is really sturdy and the cutter is metal... coolio! Anyways, enough about the box, here's about the product. Imagine if you can, Tim's Tissue Tape... without the stickyback... and a little more papery and less waxy.. there you have it... Tissue Paper. It is quite sturdy too... not flimsy but not too thick.
I have used it to cover a manila tag - using Ranger Glue & Seal to stick it down... and then popped some Antique Linen Stain over the top, dried this, then blended the edges with Gathered Twigs DI. The holly branch is stamped in Sepia Archival and one thing to remember... the ink doesn't soak in, so you need to heat set it. That's what I mean about it being a smidge waxy coated. I made some Tattered Pine Cones... oh I am SO loving these and have mastered the making of them... I just roll them up a couple of times and dab some glue on as I assemble... tis seemingly working anyways!
The tree is made up from the latest Alterations Strip die - Lace Borders. I cut these from Graphic 45 papers, layered them onto cardstock and then die cut the tree. I then used more Gathered Twigs to distress the layers and flicked them up with my fingernail... The ticket is an Adage Ticket and I am a smidge miffed because I have nearly run out of them and I wanted the word "wish" and haven't got any left... so bliss had to do instead. So, there you have it... voila, another Christmas tag.
So... time for a quick update about the old war-wound. Well, the Doc said it would be about a week before I started to feel any benefit... and it would get worse before it got better. Tis over a week now and... I think I can safely say... it hasn't worked! Ho hum, well, at least I tried I guess... back to the drawing board again. Thank you all again for all your lovely messages, it has been very comforting to know that there are so many lovely kind peeps out there... Right... time for a quick telly catch up and then bed... thanks for looking.... TTFN!
Hels x


