Thursday 30 January 2014

Hazy Shades of Winter...

... I am a self confessed Winterite you know.  I loves nothing more than seeing chilly icy patterns on the windows, bright blue skies and spiders webs sparkling like filigree silver and hunkering down on the sofa with a nice cuppa and a furry warm AlfieCat sitting on me knee.  However, I have a complaint this Winter.  Plain and simple we have had not a single day like that!  Rain?  Oh yesh, deluges of it (mm, bit of an exaggerations but you know what I mean)   Everything is brown... and grey... and I figured that whilst I am writing my complaint to the Person In Charge of Weather, (known from here-on-in as the PICOW) *railway folks will totes understand where I got that from* I would show you a card I made for last weeks' tellybox shows... cos the colours match the weather (see what I did there... teehee)


Now, don't get me wrong, I loves the old muted beiges, browns and creams on my art... just not out of my window! (or worse, out of the car window!)  So, I decided that today I shall start up a petition to the PICOW... get Spring out of bed, wake her up, give her a good old shake and tell her to get out there sprinkling her bright green and yellow sparkles... and fast!   Maybe it is asking a  bit much being as it is still only January (just!) but hello?  Bright sunshine and frosty mornings have been non existant this Winter... so let's get onto Spring already... right?


I shall away now... mini rant is over but I am now wondering if you all agree with me?  Maybe we should all sign the petition and send it off... either that or maybe I should just go and sit and grumble... until March!   Thanks for looking, have a great day!   TTFN

Hels x

Tuesday 28 January 2014

Oranges and...

...glitter!  Whatever next eh?  I have well and truly gone over to the Sparkly Side haven't I?  But then again, in my defence, Distress Glitter is rather delightful to use.   Here's another demo card from last week's tellybox shows.  This one uses Clear Texture Paste to hold onto the glitters and it was applied through the Flower & Butterfly That Special Touch mask.


I used several different colours on the main design so I got a nice light and shade look to the flower but if you don't want to have different colours, you don't have to... just use the one.   The little flower cluster was made using the Heartfelt Creations stamps on the shows, stamped onto cardstock, with Jet Black Archival, cut out and then coloured with Distress Inks with a smidge of DG in the middles using Glossy Accents to help them stick.


A short and sweet post today...  Thanks for looking, hope you having a great day! TTFN

Hels x

Monday 27 January 2014

Sunday Stamper - Week 292 - Orange Crush

Goooodly Morning Stampers and a very happy...erm.. Monday (!) to you all!  Big thanks for all the entries to last week's challenge and apologies that I haven't had chance to visit you all yet, life has a way of sending in a big old rock to climb over sometimes  but hopefully things are getting back to normal (soon!).  The new challenge for this week (and apologies for the late posting of the new theme - please see post below for the reason) is... ORANGE.   To join in with the challenge is simples: make a little something - it can be anything you fancy.  Add in the theme and some stamping and then pop back here, leave me a comment with a link to the place you are showing your entry and I can come visit.  If you haven't got a blog, you can also join in via Facebook (just tag my name on your upload) or via email by attaching a small res. pic to the email.  The challenge will remain open until 21:00 Saturday 1st February 2014.  (Feb! Already!)


This week my entry is one of my sample cards from last weeks tv shows.  I love using lots of different masks and stencils on one project, layering the designs with different colours and making my own background papers.  Here I have used Eyetlet Lace, Chicken Wire and Small Polka Dot That Special Touch masks, colouring with Antique Linen, Broken China and Seedless Preserves Distress Inks to make a patterned design.   I stamped out lots of the Heartfelt Creations Sunkissed Fleur images, cut them out and coloured with the same Distress Inks, layering them all up and adding a splash of orange in the form of Spiced Marmalade Distress Glitter (did I say, I loves this stuff!) into the centres of the flowers.  A few little embellies half hidden behind the flower clusters adds some little bits and bobs of sparkles and I also added some flourishy bits using Jet Black Archival ink.


Sorry I am late posting the challenge - as I said, the internet access in the hotel this weekend was plain weird... it was an unsecured network and Lionel Laptop was having none of it.    I shall away now... busy day ahead!  Thanks for looking, have a good week folks... TTFN

Hels x


Saturday 25 January 2014

Normal Service....

...yikes! So, here I am in ffffreeeezing Middlesbrough for my weekend retreat and I had planned to blog the Sunday Stamper whilst here... but! The internet connection in the hotel isn't playing ball with old Lionel the Laptop so I am waffling away here using Smarty the Smartphone... and the old 3G is rubbish so I can't upload a piccie!
Therefore, tomorrow's Sunday Stamper will be a little late in arriving, i.e. Monday!
Apologies folks for the delay and I hope you will still be able to join in this week... until Monday, TTFN!
Hels x

Wednesday 22 January 2014

Sparkelicious!

Corrrrr Blimey!!!  What a fab response to the tellybox shows yesterday! Thanks ever so much to you all for your messages, Tweets, emails etc  It warms the heart of my cockles to know that you enjoyed the demo's and the goodies I had picked for the shows.  My card today was made using the gorgeous papers and Heartfelt Creations stamps...I just love those browns and cream papers in the Teresa Collins paper pad... very vintage and very me :O)


This is a 6" square card base and I cut some brown Bazzill and a piece of the paper to fit.  I always like to edge my card/paper with Distress Ink, this covers up any white cores of the card and makes the edges neater and a little bit distressed.  I used Walnut Stain to do the inking around the edge and then stamped the Heartfelt Creations Sun Kissed Fleur stamp in Black Archival. A zap with a heat tool to set the ink and then I set about colouring the image in using Forest Moss Distress Ink, squidged onto my craft sheet and then painted in using a waterbrush. I stamped the flowers again twice on more of the papers and cut out the little flowers, some are really teensy but I think it is worth the faff to have them on the card.  Once cut, I used Walnut Stain DI again and edged these and coloured the backs of the flowers... again, a little attention to detail :O)  I used Glossy Accents to dot into the centre of the flowers and then poured Black Soot Distress Glitter over the top and tapped off the excess. I LOVE the Black Soot... muchly!!!  I then added a piece of twine and a Fancy Key and couple of the Sparklers/Dazzlers under the flower pile.  A sentiment from the Thoughtful Sentiments CE stamp plate and a bit of bling in the form of the pearl swirl and there you have it... uno finished card!


I am blogging later than intended today.  This morning it was time for Ferdy to go in for his MOT.  I absolutely hate that hour long wait... whilst the mechanic man is prodding and measuring and revving and testing my little car... but... hurrah and thrice!  He passed!  I loves my car (and I loathes the thought of mahoosive repair bills... just think of all the stash you could get for that!!)  Then I spent the day cleaning (I didn't say the H word... hope no one is offended lol)   and tidying and sorting and putting away.   Anyways, I now have a stack of cardstock cut and ready to diecut for my retreat classes this weekend... tonight I shall mostly be cutting and kitting.   I shall away... to cut and kit!  Once again, thanks for all your lovely messages and kind support, makes me very smiley happy!   Thanks for looking... TTFN

Hels x


Tuesday 21 January 2014

What Is Normal???

...indeedily!  Today is the day that I shall be on yonder tellybox doing a couple of Creative Expressions Stamping shows.  Times are 11am and 7pm and all the deets on how to view the channel are over there *left hand sideybar*   So, what is normal?  Well, normal for me is a little bit dull, a little bit monochrome, a little bit brown with a little bit of blue thrown in for goodly measures.  I guess you are going to be a little bit surprised to see this creation from my own fair hand....


Customary to the trend I seem to have set meself for 2014 is the use of purple.  And pink!  I know, whatever next... glitter?  YOU BET!  Well, it is Distress Glitter after all so don't worry, I haven't completely gone over to the "sparkly side" ... just a wee bit.  This was created using a That Special Touch stencil - Fuchsia - love this one because I love fuchsia's and now I have my greenhouse, I am planning on have very lots of them so I can keep them over winter.  Also appearing on this card are some Heartfelt Creations stamps (yip, loves these too!) and Distress Glitters in Seedless Preserves, Picked Raspberry, Spiced Marmalade and Peeled Paint. I will be demo-ing the technique I used to get the multi coloured image so I hope you can tune in to see it.


I really must get a wiggle on... tis nearly midnight and I have to be up early to get to the studio's and as usual, my nails needs attentions and I really should be getting myself some sleeps!  Have a great day and hope you can join me on the shows.. don't forget to email in if you can as there will be giveaways!   Thanks for looking... TTFN

Hels x

Monday 20 January 2014

Dandelion Butterflies

...cor blimey, I don't know about you but this year is whipping past super fast already!  Tomorrow I shall be on Create & Craft again with two stamping shows - times are 11am and 7pm and the deets on how to view are over there *points left*   I have been busily beavering away in the Room of Stash making some samples for the shows.


Today sees my fave of the bunch so far... this one I have called Dandelion Butterflies.  I love the word dandelion - and I loves dandelion & burdock too... Morrie's do a lovely diet version of it too.  anyways, enough of the waffles... this card has been made using the Dandelion stencil from That Special Touch... and some Texture Paste... and a bit of Distress Ink and a brace of 490 butterflies... and... something else!


Can you guess what it is yet???  Something very unusual for me you know... but I am on the turn!  Oh yesh!  Glitter!  Distress Glitter in fact.  Mind you, I did have a wee mishap yesterday afternoon... when my clumsy elbow knocked the Seedless Preserves pot off my desk... and onto the carpet below.   A few curses and bleepy words followed... because I had left the lid off!  Yikes, the Room of Stash actually got a vacuum!  Well, it has to happen every so often right?   I shall away... more samples to make and demo's to prep... hope you having a great day!  Thanks for looking, TTFN

Hels x

Sunday 19 January 2014

Sunday Stamper - Week 291 - Ultraviolet

Goooodly Morning Stampers and a very happy Sunday to you all!   Huge thanks for all your entries for the last challenge, it was lovely to see some new peep's entering too.  This week there be a new theme (and my fave U2 song is the title)... and that is... VIOLET/PURPLE.  To join in with the challenge is simples: make a little something - it can be anything  you fancy.  Add in the theme and some stamping then pop back here to leave me a comment with a link to the place you are showing your entry.   If you haven't got a blog, you can also join in via email - just email a small res pic to me or via Facebook, simply tag my name and I can view your entry.  The challenge will remain open until 21:00 Saturday 25th January 2014.


 My entry this week is a tag that I started yesterday at my class at Craftique in Hessle.  We were doing a Distress Paint mixed media canvas and I decided to do some demo-ing onto a tag too... hence this one was born.  Also, I seems to have a bit of a "purple" thing going on at the moment because my chosen Paints were Dusty Concord (LOVE this!!!) Broken China and Bundled Sage.  Once they were applied onto the tag (drippy layers technique) I dried them off and then got some of Wendy's Embossing Paste and spread it through her Three Flourishes Stencil (which is there, down at the bottom of the tag, hiding 'neath all the embellies)


A bit of stamping in the form of the gorgeous background stamp from Studio 490 Heirloom Art, stamped onto tissue and applied with Glue & Seal so I could add stamping over the top of the embossing.


As you can see, I went a bit mental with the embellies... nowt new there then lol   The flowers were sprayed with Black Marble Dylusions and Egyptian Blue Cosmic Shimmer sprays.  The leaves are from Tim's new Garden Green Sizzix die, painted with Forest Moss DP and dabbed whilst it was still a bit wet to add some dimension to them.  Check out the little word "dream".  That was kindly donated by one of my workshop ladies, Susan, so thanks Susan, I love that ickle word!  Adding another word using Alpha Parts onto an Ornate Frame finished the tag off nicely.


Today I shall mostly be beavering away in the Room of Stash making samples for my tellybox shows on Tuesday.  I am on at 11am and 7pm with some really cool goodies... hope you can join me!   I shall away now... thanks for looking, have a great day!  TTFN

Hels x

Wednesday 15 January 2014

Favourites...

... I know, we shouldn't have them should we... but hand on heart, who can honestly say that they don't have "favourites"?  Thing is, I have so many favourites that I just think that everything I do in this arty bubble I live in is my favourite!  Anyways... the point of this waffle is to show what I got up to on Monday.  I was invited to teach a private class for two lovely ladies, Claire and Jane, 'round at Claire's house.  Gulp. Me, crafting, in someone elses home?  I was a bit scared that I would end up flicking paint and ink all over the place so before I arrived, I gave myself a good talking to.. "Hels" I said, "You don't have to be a mucky pup you know... "  "Don't I?" I answered myself...  "No, indeedily, you can be the cleanest crafter in the world *said in my very best Jeremy Clarkson voice* if you really try"   So, armed with lots of delish stash to play with, I arrived at Claire's, all ready to show just how neat and clean I can be.


Actually, I did manage to keep things relatively clean... I only got stuff on me, thankfully not on Claire, Jane, the cats, the floor, the walls... which is unusual seeing as you can usually look at my clothes and see exactly what I have been using on any particular day.  We had a wonderfully fun crafty day... altering a canvas with Distress Paints, yep, favourites...   Wendy's Embossing Paste, oh be still my heart, always a favourite indeedily... And lots of paper flowers... aha, more favourites... and embellishments... yippy-yi-ay, favourites.. and... Treasure Gold.  What more can I say huh?  FAVOURITES!!


The colours of DP's I used are Iced Spruce (fave!) Aged Mahogany (always a fave) and Victorian Velvet (new fave!)  Lots of watery drippage and then the embellishing bit.  I used a Crafter's Workshop stencil for my Embossing Paste bit... and of course, adding smidges of Treasure Gold really highlights the peaks and textures.  A big massive thank you to Claire and Jane for making me so welcome, feeding me delish food (why does it always come back to food with me huh?) and making the day so enjoyable!


Right, I shall away... today I am mostly die-cutting for my Ali-Craft class on Friday... oh and I didn't mention... I have a new arrival in the Room of Stash. Oh yesh, Ernie the EBosser has come to live with me!  Tis my Xmas pressie from Grim, I am soooo lucky! I have had a little play already and I am in lurves, it is sooo easy to use!  I will, of course, still use Victor because I loves him too but it just makes kitting for classes so much easier now, I can have both machines going at the same time!  Multi-tasking die-cutting!   Thanks for looking, have a great day!  TTFN

Hels 

Sunday 12 January 2014

Sunday Stamper - Week 290 - On The Wings of Love

Goooodly Evening Stampers and a very happy Sunday to you all!   Huge thanks for all your entries for the last challenge...  this week there be a new theme... and that is... WINGS.  To join in with the challenge is simples: make a little something - it can be anything  you fancy.  Add in the theme and some stamping then pop back here to leave me a comment with a link to the place you are showing your entry.   If you haven't got a blog, you can also join in via email - just email a small res pic to me or via Facebook, simply tag my name and I can view your entry.  The challenge will remain open until 21:00 Saturday 18th January 2014.


Firstly, apologies for the late posting of this weeks challenge... this is because I am teaching away from home this weekend and couldn't get online this morning (thanks Mr BT for doing your engineering stuff lol)  So, better late than never, here is my entry for this weeks challenge.


I have been teaching at Pickwell Farm this weekend, I love teaching here, not only are the ladies who come along a lovely bunch, Carolyn and her family always make me very welcome... not to mention the ace shop, packed to the rafters with stashly delights... yep, tis a lovely place to be.  Anyways, this weekend has been all about the Melt Pot.. and I have made a canvas (actually I made two - I know, I never finish class samples and this time I managed to get two done.. get me!  A new year, a new me... pah lol )   My demo canvas is 8" x 6" in size and once I had painted it, I set about doing some beeswax collage.  Stamping onto tissue and then applying wax... and then.. I had a "lightbulb" moment!   So, I wanted to colour the beeswax.  How to do that?  Well, I have used Melt Inks before to do this, but they do bobble a bit in the wax, whilst they colour it, there's always a residue in the bottom of the mould.  So, I hit on the idea of using Mica Powders to colour it.. hey, it works!!! Yipyah and thrice, a new technique!  Check it out, how sweet is this flower!!!


I used a mix of Kaisercraft and Tim Holtz stamps... and yes, butterflies always seem to feature somewhere on a creation...plus faux porcelain flowers... and some Treasure Gold for goodly measures too...


I shall away now... I am staying in Southampton tonight as I am teaching a private class tomorrow and I needs food... so I am off to have a mooch about and see what I can find.  Thanks for looking, sorry again for the lateness of the post!  Thanks for looking, TTFN

Hels x

Saturday 11 January 2014

True Lurves...

...awww, friends of ours got engaged over Christmas... awwww, I loves a wedding I do, being a bit of an old romantic.  So, I made them a card.  Now, regular readers of my daily wafflings will be well aware that cardmaking isn't really my forte... but I do like to make special ones and personalizing them.. so I got my "pretty" head on and made this for them.


The papers are the gorgeous Violet Crush Kaisercraft collection that were in my Jones DT kit this month.  Check it out too... purple!  I know!  Told ya, I am turning purple this year for some reason.  Mind you, it isn't difficult with these papers cos they is lushness indeedily.  I added Seedless Preserves DI around the edges of the papers and card base - well, I can't make a clean and simple card to save me life, there has to be some sort of inkiness going on.  The words are computer generated and die cut with Nestabilities.  I added some Kaisercraft Wisteria paper flowers... but whilst they are gorgeous, they looked a little pale, so I smudged some more of the Seedless Preserves on to them and then slapped some Glue & Seal on the edges of the petals and then sprinkled Rock Candy Distress Glitter over the top so they sparkle gently.  A twist of ribbon and there it was made.  One day I am going to go on a proper card making course and learn how to do the fancy stuff that a lot of people do!


I am scheduling this post as today I am travelling to Pickwell Farm in Southampton for two days of Melt Pot Master Classing... so I better get a wiggle on and get myself some beauty sleeps!  Have a great weekend, don't forget to pop back tomorrow for a brand new Sunday Stamper challenge.  Thanks for looking... TTFN

Hels x


Friday 10 January 2014

The Key of Life...

...I was going to do another cheesy song thing again and decided against it today, my singing is even offending me at the moment lol   Anyways, another day, another demo sample from my Melt Art telly shows on Wednesday.  This creation was the main demo piece on the 5pm show.  As with the 12pm show, I decided to go with this new idea I have had... not making an "original" piece for the demo... you know, where I do the "here's one I made earlier" thing.  So, I prepped up this piece and just went for it.  I am still convinced it makes things feel a bit fresher...  


The base for this piece is a bit of cardboard that I ripped off some of the top layer to expose the corrugations.  Ooh, I likes that word... corrugations... it kind of rolls off the tongue doesn't it?  Anyways, once I had removed some of the top layer I set about colouring it with paint.  Starting with Mushroom Eco paint and then adding smudges of Cool Peri and Pool Dabbers applying the paints with Cut & Dry.  I also coloured a mini canvas in the same way so the piece had some 3d-ness to it.  A piece of cosmetic tissue, cut to size and then stamped with the Heartfelt Creations Tattered Blossom stamps and a few CE Newsprint Flourish stamps, adding a bit of a background design.  I did the same with the sentiment... a single layer of cosmetic tissue and some flowers and swirls.  The tissue was applied with beeswax, I just love the way the wax makes the tissue disappear.. meaning you can get a stamped image perfectly onto the corrugations... mm, am so gonna be saying that word all day!


I made roses out of the Posy Patch flowers stamps and scrapbook paper and stamped and cut the Classic Leaves out and these were dipped into UTEE for the Faux Porcelain effect.  I dragged the metal leaves through the clear UTEE too so they get completely coated... loves this effect too!  The ickle Hat Pin was filled with Tropic Violet, Lapis Sapphire, Olympic Gold and Black UTEE.  If you use your Melt Pot lid as a template, pop it onto a craft sheet, draw around it, cut it out leaving a couple of flaps sticking up at the sides, you have the perfect way of lifting stuff in and out of the Melt Pot.  Placing the Hat Pin on the craft sheet in the Pot heats up the metal, then when you add the powders, they melt and you can swirl them around and make patterns... look at the colours in this...


I am back on the tellybox on January 21st... and I have a new-to-me product... you will be a wee bit surprised when you sees me using it you know... but I have to say... I lurves it!  Thanks for looking.. have a fabby day! TTFN

Hels x

Thursday 9 January 2014

A Million....

...Page Views!!!! *sang to the tune of a Million Love Songs by Take That... sorry about the whole changing-the-words-keeping-the-tune-thing I seem to be doing a lot of..... *  Cor blinking blimey and thrice alive!!!  I been mooching around Blogger this morning, you know, faffing about trying to get up the courage to actually have a jazzy background on me old bloggetty-blog.  And then I sees this...


Yeppo, flabber-truly-ghasted moment!  Over a million page views since I started this little patch of yonder t'internet I can call home.  Firstly, THANK YOU for all those page views! Sure made me smile mahoosively this morning!   Anyways, enough of that waffle... here's some more waffle about my tellybox shows yesterday.  Gigantic, ginormous, jumbo (wracking brains to think of more words that mean big starting with a J) thanks for your response to the Melt Art shows yesterday on Create & Craft.  I love doing the Melt Pot shows because each time there are more and more of you lovely peeps getting addicted to this little machine of magic.  I get lots of questions asked about the Melt Pot.. and I am happy to answer them, so if you are one of those crafters who own a Melt Pot that is languishing in the back of a cupboard, unloved, unused (and still in its box lol) please do get the little machine out and have a play.  And how do I know that a very lot of you are identifying with my description?  Well, cos I was exactly the same... then  Suze Weinberg was in the UK on telly over here in the UK and I fell in lurves with her and the Melt Pot.  Suze has retired now but she is still creating her awesome art, CLICK HERE for her blog... and do take time to go and watch her YouTube Channel vids too... she is THE Queen of the Melt Pot, I bow to her greater knowledge and I tell you what, I have been inspired soo much by her... and she is a gorgeous gal too... did I say I lurves her?


Normally when I do my demo's on the telly box I already have an "original" made.  But, I sometimes think it can look a little bit too prepared, not as fresh as I would like it to be.  So, armed with a big bit of "let's see if this works" I got together all the bits and bobs that would make something that resembled what I had in my mind... I do little sketches of projects all the time so I figured it would work, do  you do that?  When you sit down to make something, have you got an idea what the "finished" thing will look like?  I have always done it... I am interested to know how the minds of other crafters work... are you like me, with an idea of how it will look?  Or are you a free spirit with a "let's see where this takes us" kind of crafter?


Anyways, if you didn't see my demo for this creation, how I made it is simples:  pop some scrapbook paper onto some cardboard. Add a strip of torn paper. Pop a piece of paper onto a Nestaboard shape.  Add some stamping using StaZon and then set about altering it with Beeswax.  Painting beeswax onto the surface of the paper gives it a really lovely vintage appearance.  The flower is a pile of the Tattered Blossoms images, layered up and dipped into clear UTEE for the Faux Porcelain effect.  Same with the leaves, stamped in Fern Green Archival (this is my FAVE green every... thank you Wendy Vecchi for inventing this colour archival!) and dipped into the clear UTEE.  The Hat Pin had a die cut bit of card, stamped with another Tattered Blossom and coloured with Dried Marigold Distress Marker and then filled with more clear UTEE.  I added Saffron Yellow and Azure Blue Melt Inks to the clear UTEE to make green and then I dragged the little metal leaves through the UTEE to fill in the spaces between the veins... I LOVE this effect muchly.  And there you have it!


Right, I shall loves ya and leaves ya now... once again, thank you for all your visits over the years... I am still grinning like a loon that my blog has had sooo many hits!  Thanks for looking, have a grand day!  TTFN

Hels x

Wednesday 8 January 2014

Tic Tac Toe

...today is the day! Oh yesh indeedily, my first tellybox shows of 2014 are today at 12pm and 5pm on Create & Craft... all the deets on how to view are over there *points left*     A yonk and a half ago I used to make these "tic tac toe" designs on an 8" square base with 2" square tiles.  And you know that "if you like this you may also like...." thingy at the bottom of all my posts?  Well, one popped up from 2008 and it was this style... and it got the old cad Mojo all a-gog!


So, being as I am completely out of 8 x 8 canvases, I decided to improvise and cut some mountboard to size.  I also cut some 2 x 2 mountboard tiles too whilst I was at it.  Then I got all painty with Adirondack Dabbers and coloured the bases and then set about altering them.  Five of the tiles have a napkin collage on them, using beeswax as an adhesive is so cool (or hot lol) as it kind of "melts" the napkin so it disappears and leaves the design behind.  The other four tiles have the Tattered Blossom Heartfelt Creations flower stamped onto them... I then used Distress Markers to colour the flowers (oh my, I loves this set!)  I seem to have gone all purple since new year - not me personally though, mind you, it felt so cold last night my feet could well have been blue!  Anyways, back to the art... I gave the base and all the tiles a nice layer of beeswax... I love beeswax, have I ever mentioned that??   I stamped some more of the flowers onto Teresa Collins/Creative Expressions papers and cut them out, glued them and then dipped them into clear UTEE in the Melt Pot to faux porcelain them... I loves a faux porcelain I do!  I added some embellies - using Majestic Purple, Tropic Pearl and Black UTEE's and pouring them into a Media Mixage Bezel and two Hat Pins - I removed the pins from the Hat Pins by twisting the pin around in a pair of pliers... they are nice and bendy so them do come apart quite easily.


I must away now... it is nearly 2am and I am just about to get my old carcass into bed... early start in the morning but I never sleeps right the night before telly shows so me not going to bed before now is normal... good job I am a night owl!  Hope you can join me today ... and don't forget, if you have a question, do please email in, we will get as many asked and answered as possible.  Thanks for looking, have a goodly day!  TTFN

Hels x


Tuesday 7 January 2014

Sample Time...

... I really should stop saying that because now I am sitting here going "sample-time... dedededu de du"  you know, like Hammer Time but a bit more mental?   Sorry about that, I am in a state of excitement because tomorrow sees my first tellybox shows on 2014.  I am on at 12pm and 5pm on Create & Craft - all the deets on how to view are over there *points left* - with more Melt Pot Marvels shows.


This is a little 5" x 7" canvas I have put together as a sample.  The base has been painted using the scraped paint technique and then I did some stamping on tissue with a new gorgeous set of Heartfelt Creations stamps (yes, they are flowers, yes, I LOVES them!)  I have to add some Faux Porcelain in there... so that was taken care of using the same flowers I used for the background collage... they were stamped onto Teresa Collins/Creative Expressions papers... and I added a little Media Mixage Hatpin to jazz the whole thing up.


 I shall away now... I almost forgot to blog today - I did write a "to do" list but I have forgotten where I put it *see what I am up against here lol* so I have made another... and I just know there is something missing from it.  I can see that I am going to have to start writing two lists, one to lose and one to glue to my forehead lol  Thanks for looking, hope you can join me for the shows!  TTFN

Hels x 

Monday 6 January 2014

Coffee Time!

...tis a yonk and a half since I did any altered recycling and when my mate Sue sent me a tin of coffee a few weeks ago, I fell right in lurve not only with the contents (Nescafe Azzera - NOM!) I also fancied the little tin that the coffee came in.  Being as I drink gallons of the stuff, I soon finished the tin and got straight onto the alterations.  My Jones of Nottingham DT pack came through a few weeks ago and in it is the brand new Violet Crush papers from Kaisercraft.  Purple? And me? Not normally but these are SO gorgeous, I dived right in. They are... LUSH!


I cut strips of the papers to wrap around the tin, edging them with Seedless Preserves DI before sticking them down.  Once they were attached, I added a little "spine" up the back of the tin, adding some fabby natural coloured buttons, also from Jones, tying threads of jute through them - nobody likes a bare button now, do they?


I added some gorgeous Kaisercraft papers flowers - these are Wisteria coloured and I spritzed them with Black Marble Dylusions and a purple colour Cosmic Shimmer mist.  The Word Band had a smidge of Antique White Kaisercraft paint smudged into the letters to make them pop more and then I used my own brute strength to bend the Band so it curved around the tin.  Ok, ok, they are pretty easy to bend so I admit, I am not that strong lol *not as strong as the coffee I have been quaffing*   The sentiment is from a Studio 490 stamp set, stamped onto more of the papers so they co-ordinate and it was popped into a Memo Pin to hold it in place.  I needed a nice container for my paintbrushes, so here it is.  Please don't tell me off about the state of me brushes though, they are all well loved and the one that is really fat is like that on purpose - oh yes, I purposefully forgot to clean it out properly... ahem... mmmm, believe that?


I shall away now, I am scheduling this post and it is way past my bedtime... plus it is chillywillybilly here tonight... I am fair frozen, the radiator in the Room of Stash is hot but is has to try and get heat around a room that is, well, at best described as... messy.. or untidy... more like chaotic.  One day I WILL get it sorted... I will... one day!  Thanks for looking... have a great day. TTFN

Hels x

Sunday 5 January 2014

Sunday Stamper - Week 289 - All I Have To Do Is Dream

Goooodly Morning Stampers and a VERY Happy New Year to you all!  Huge thanks for all your entries for the last challenge... I have a winner for the blog candy to be announced ... but more of that in mo!  Firstly, I am introducing you to the brand new theme for this week, in honour of the sad passing of Phil Everly, the theme this week comes from the song title of one of my fave Everly Brother's songs... DREAM.  To join in with the challenge is simples: make a little something - it can be anything  you fancy.  Add in the theme and some stamping then pop back here to leave me a comment with a link to the place you are showing your entry.  I keep getting asked about "how to see the gallery of entrants".  Well, there isn't a gallery, the way to see what other peeps' have been making is to simply click on their link they have left in the comments box.  If you haven't got a blog, you can also join in via email - just email a small res pic to me or via Facebook, simply tag my name and I can view your entry.  The challenge will remain open until 21:00 Saturday 11th January 2014.

For some reason my camera is making it look like a fisheye lens....

Coincidentally, my Word of 2014 is 
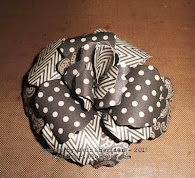
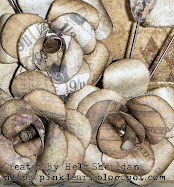
Dream and I have been making this canvas for the past week... it is mahoooosive - the biggest canvas (12" x 16") I have ever tackled and I have to admit, I was really phased at first, doing something on such a big scale and all that... but, hurrah and thrice, thanks to the wonderful Craft Obsessions, my brand new Tattered Florals die arrived during the week... so that took care of the floral embellishment thing... ginormous paper rose!  Check out the size of it!  The little roses next to it are the normal Tattered Florals size rose that I make using the largest flower on the die.  WOW!  Here's the canvas before I got handy with the embellies...

Yep, fisheye... am rubbish at photographing stuff!

Oooh, before I forget... the winner for the candy giveaway from last week's challenge!  Well, there were 90 entries in total and I fed this into Random.org and he came up with the number 23... which tallies with the entry from LISETTE BAKER.  Congrats to Lisette, please pop me and email over with your addy and I will send your candy to you :O)


Moving on... and back to the gigantic canvas!   Now I bought this canvas about 261 years ago and it has been lurking under my desk gathering dust.  Last Saturday Ellen and I had a Skypey sesh but this time we just did our "own thing" instead of a challenge... and being as I was feeling brave *or stoopid* I decided to unearth said canvas and give it a makeover. This took me hours to do... I did take my time though, I wanted to make sure I got it exactly how I wanted it as it will be hanging up in the house... somewhere... when I find the hammer and nails.... lol


Of course, putting paint onto such a big surface had me shaking with fear, so I decided to go straight into my comfort zone and got out my gorgeous Kaisercraft papers (from Jones of Nottingham DT)... the papers are from the Art of Life and 75 Cents collections.  A spot of paper blocking... I know, I told you, comfort zone... and some texturing in the form of Wendy's lush 490 Embossing Paste and Tim's Layering Stencils... and then some stamping using Kaisercraft background stamps - I used Bubble Wrap and Diamonds and Wendy's Signature Designer Archival Inks in Potting Soil (bubble wrap) and Watering Can (diamonds).  I LOVE those Archival ink colours... and... exciting news... Wendy has 6 new colours being released at CHA next week... check out HER BLOG to see the colours (you will be needing them as muchly as I do!!!)


As mentioned before... the brand new massive Tattered Florals die landed on my doormat the other day... along with the new Garden Greens die too.  Now, as  you all will have probably sussed, I LOVE making paper roses.  I usually use the largest of the Tattered Florals (original size) die to make them... and sometimes use the Movers & Shapers Mini Tattered Florals too.  I made the new big rose exactly the same as I do the others... SEE HERE for a photo tut that I did yonks ago.  Make the big rose in the same way but cut a couple of extra petals so you can "fill" the gaps.. so cutting 3 and a half flowers is the easiest way.  I used the same papers to make them and then spritzed with Black Marble Dylusions and Red Firefly Cosmic Shimmer sprays.  The leaves are mountboard painted with Forest Moss Distress Paint.  Of course, I had to pile on the embellies - the word is made up from Grungeboard letters and coloured with Black Soot DI and the embellies have all had the Treasure Gold treatment, Rose Quartz, Ruby, Copper and White Fire being my chosen colours.


And there you have it!  I have finally altered that canvas... the big scary one!  And, I actually feel like making more of these big ones now... daring is my middle name (well, it isn't really ..it does have a ring to it though)   Right, I shall away... I have got tellybox shows on Wednesday so today I will mostly be making samples and getting all creative with the Melt Pot.  Have a great day!  Thanks for looking... TTFN

Hels x

Related Posts with Thumbnails